
Table of Contents
- Planning Your Small Bathroom Shower Layout
- BC Building Code Shower Requirements and Permits
- Plumbing Rough-In for Bathroom Renovation
- Waterproofing Shower Installation Best Practices
- Tile Work and Shower Pan Installation
- Ventilation and Humidity Control in Small Bathrooms
- Frameless Glass Enclosures and Accessibility Considerations
- DIY vs. Professional Installation for Small Bathroom Showers
Last Updated: August 9, 2026
Planning Your Small Bathroom Shower Layout
The first decision when installing a shower in a small bathroom is understanding your actual space constraints. Most homeowners underestimate how much room a functional shower truly needs, leading to cramped installations that feel awkward and impractical. A properly planned small bathroom shower works beautifully when you know the minimum dimensions and layout options that matter.
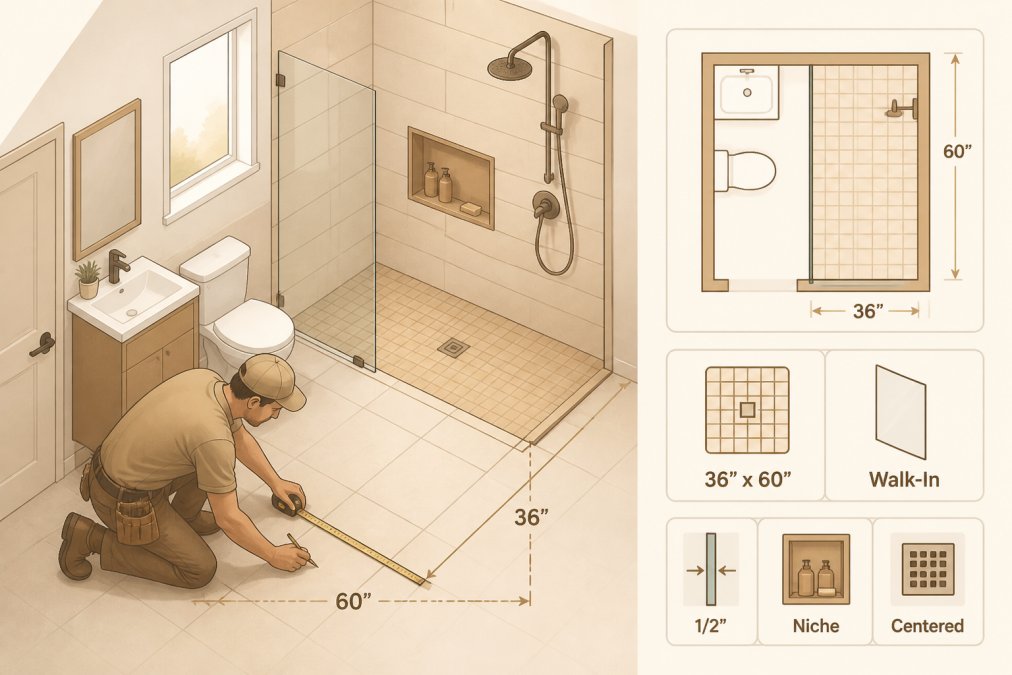
Minimum shower dimensions and space requirements
A functional shower requires a minimum footprint of 0.75 square metres. The BC Building Code specifies that shower compartments must have a minimum interior dimension of 80 centimetres by 80 centimetres (approximately 31.5 inches by 31.5 inches), though comfort improves significantly with 90 centimetres by 90 centimetres or larger.
The key measurement most homeowners miss is clearance outside the shower door or threshold. You’ll need at least 60 centimetres of clear floor space in front of the shower entry for safe, comfortable use. Measure from the shower entry point to the nearest wall, vanity, or toilet. If you have less than 60 centimetres, you’re facing accessibility challenges that affect daily usability.
The shower head should be mounted between 180 and 210 centimetres from the floor, depending on household members’ heights. For a small bathroom with a sloped ceiling or low clearance, this can become a constraint. White Rock Handyman & Renovations has completed numerous small bathroom renovations across Surrey, South Surrey, Langley, and Delta, and we’ve learned that ceiling height often drives the entire layout decision.
Walk-in shower versus shower enclosure options
Walk-in showers (curbless or threshold showers) eliminate the step up, making the bathroom feel larger and more open. The shower pan sits nearly flush with the surrounding floor, creating visual continuity that makes even 0.75 square metres feel spacious. The trade-off: walk-in showers require sophisticated drainage and waterproofing because water flows across the entire bathroom floor toward the drain. This demands a proper drainage slope (typically 2 centimetres per metre toward the drain) and a waterproofing membrane that extends beyond the shower area.
Traditional shower enclosures (with a threshold and glass door) contain water more effectively and require less complex waterproofing. The threshold acts as a barrier, directing water toward the drain. This approach works well in tight spaces because it protects adjacent flooring and walls from moisture, though the threshold takes up visual space.
For most small bathrooms in the Lower Mainland, a walk-in shower with proper waterproofing delivers the best balance of functionality and perceived space. However, if your bathroom has severe plumbing constraints or existing floor conditions that make slope adjustment difficult, a traditional enclosure may be more practical. If you’re considering a walk in shower installation cost Surrey BC, our team can assess your specific space and recommend the best approach for your layout and budget.
BC Building Code Shower Requirements and Permits
Installing a shower in British Columbia requires compliance with the BC Building Code, which governs everything from minimum dimensions to ventilation and plumbing. Many homeowners skip the permitting process to save time, but this creates serious liability issues if something fails or causes water damage later. A licensed contractor like White Rock Handyman & Renovations handles all permits and inspections as part of the installation.
The BC Building Code requires that all bathroom renovations involving plumbing, structural changes, or waterproofing receive a municipal permit before work begins. Your local municipality (Surrey, Langley, Delta, Cloverdale, White Rock, South Surrey, or Tsawwassen) issues the permit and schedules inspections at key stages: rough-in, waterproofing membrane installation, and final completion.
Inspectors verify that your shower meets code requirements for drainage, ventilation, fixture placement, and material standards. Skipping inspections means you have no documentation that the work meets code, which affects your home’s resale value and your insurance coverage if water damage occurs.
Your contractor must carry WorkSafeBC clearance letters and Commercial General Liability (CGL) insurance before beginning work. These credentials protect you if someone is injured during the renovation or if property damage occurs. Always verify that your contractor holds current WorkSafeBC clearance and carries CGL insurance with a minimum of $2 million coverage. Municipal business licensing is also required in all Lower Mainland communities where we operate.
Plumbing Rough-In for Bathroom Renovation
The plumbing rough-in is the foundation of every shower installation. This is where supply lines (hot and cold water) and drain lines are installed before walls are closed up. Getting the rough-in right is non-negotiable because fixing plumbing problems after tile and waterproofing are complete costs thousands of dollars and requires demolition.
Drain slope and drainage considerations
The drain line must slope toward the main sewer connection at a minimum grade of 2 centimetres per metre of horizontal run. This ensures water flows continuously without pooling or backing up. In small bathrooms, this slope requirement often dictates the floor height and subfloor structure.
The shower drain must connect to a trap (a U-shaped section of pipe that holds standing water) to prevent sewer gases from entering your home. The trap must be accessible for cleaning if it becomes blocked. For walk-in showers, the drain typically sits at the lowest point of the floor, requiring the entire shower area to slope toward it. This is more complex than a traditional shower pan, which has built-in slope and a single drain connection.
Mixing valve and fixture placement
The mixing valve (thermostatic mixing valve) controls water temperature and pressure. It should be installed at a convenient height for access, typically between 100 and 120 centimetres from the floor. The shower head and any secondary fixtures must be positioned based on the mixing valve location and supply line routing.
In small bathrooms, minimizing the number of fixtures simplifies plumbing and reduces the risk of pressure issues. A single overhead shower head with a hand-held option (on a slide bar) delivers flexibility without the complexity of multiple body jets.
Waterproofing Shower Installation Best Practices
Waterproofing is the most critical step in any shower installation because it prevents water intrusion into the subfloor and walls. A failed waterproofing membrane leads to mold, structural rot, and expensive repairs. This is where professional installation makes an enormous difference.
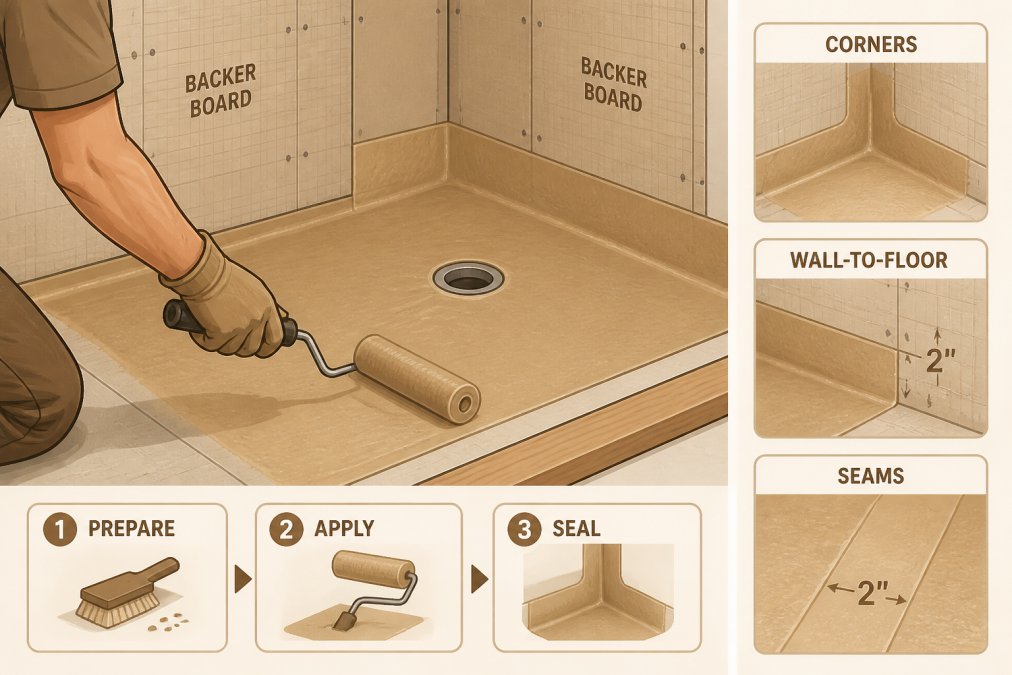
Waterproofing membrane and backer board installation
The waterproofing membrane is a continuous barrier that prevents water from passing through the subfloor and into the structure below. It’s typically a liquid-applied membrane or a sheet membrane (like chlorinated polyethylene). The membrane must cover the entire shower floor and extend up the walls at least 150 centimetres from the floor.
Before applying the membrane, the subfloor must be prepared. Any soft spots or uneven areas must be repaired or replaced. Backer board (cement board or foam board) is then installed over the subfloor, providing a stable base for tile and waterproofing. Backer board is moisture-resistant, unlike standard drywall, which absorbs water and deteriorates.
The waterproofing membrane is applied over the backer board, with careful attention to seams, corners, and penetrations (where pipes pass through). All seams must be sealed with compatible sealant to prevent water from seeping through gaps. The membrane must extend beyond the shower area to protect adjacent flooring and walls.
Silicone sealant and grout line protection
Once tile is installed, silicone sealant seals the grout lines and joints between tiles. Grout itself is porous and allows water penetration, so sealant is essential. Sealant must be applied to all grout lines in the shower area, including the corners where walls meet the floor, and should be reapplied every 2-3 years as part of routine maintenance.
Epoxy grout is more water-resistant than traditional cement grout, though it’s more difficult to apply. For small bathrooms where moisture control is critical, epoxy grout combined with silicone sealant provides maximum protection.
Tile Work and Shower Pan Installation
Tile selection and installation affect both the appearance and durability of your shower. In small bathrooms, tile choices also influence how spacious the area feels. Large-format tiles (30 centimetres by 60 centimetres or larger) create visual continuity and make the space feel larger than small tiles, which create more grout lines and visual clutter.
Tile continuity and curbless entry options
Tile continuity means using the same tile material and grout throughout the shower floor and surrounding bathroom floor. This creates a seamless visual transition, making the bathroom feel larger and more cohesive. For walk-in showers, this is essential because the shower floor and bathroom floor are visually connected.
Curbless entry (threshold-less) is the modern approach to walk-in showers. The shower floor slopes toward the drain, and the tile continues seamlessly from the bathroom into the shower. There’s no step or lip, which improves accessibility and visual flow. However, achieving proper slope while maintaining visual continuity requires careful planning and skilled tile work. A curbless tile shower installation Surrey BC project demands precision to ensure both functionality and the seamless aesthetic that makes small bathrooms feel larger.
Recessed niches and space-saving storage solutions
In a small bathroom, every centimetre of wall space matters. Recessed niches (small shelves built into the shower wall) provide storage for soap, shampoo, and other shower items without taking up floor space. A recessed niche is typically 30 centimetres wide by 60 centimetres tall, recessed 10-15 centimetres into the wall. Multiple small niches at different heights improve usability and make the space feel more thoughtfully designed.
Ventilation and Humidity Control in Small Bathrooms
A small bathroom shower generates significant moisture, and inadequate ventilation leads to mold, mildew, and structural damage. The BC Building Code requires that all bathrooms have exhaust ventilation that removes moisture to the outdoors. For a small bathroom, a minimum of 50-80 CFM (cubic feet per minute) is required, though many professionals recommend 100+ CFM for showers in tight spaces.
The exhaust fan should run during and for at least 20 minutes after showering to remove moisture effectively. The exhaust duct must run directly to the outdoors, not into an attic or crawl space. Proper ductwork installation (insulated ducts, sealed connections, exterior damper) prevents moisture from condensing inside the duct and dripping back into the bathroom.
Natural ventilation (opening a window) helps, but it’s not sufficient for a shower in a small bathroom. An operable window should be combined with the exhaust fan for maximum moisture control. If your small bathroom has no window, the exhaust fan becomes even more critical.
Frameless Glass Enclosures and Accessibility Considerations
Frameless glass enclosures (shower doors with minimal framing) are popular in small bathrooms because they’re visually open and don’t create the enclosed feeling that framed doors do. A frameless door is a single pane of tempered glass (typically 10 millimetres thick) that swings open on heavy-duty hinges. The glass is transparent, so the shower doesn’t visually divide the bathroom.
The trade-off: frameless enclosures require precise installation and careful maintenance. The glass must be perfectly sealed at the hinges and edges to prevent water leakage. Frameless doors also cost more than framed alternatives, though the visual benefit often justifies the expense in small bathrooms.
For accessibility, a frameless enclosure with a curbless entry and grab bars offers the best combination of safety and visual openness. Grab bars should be installed during the rough-in stage so they’re anchored to the framing behind the tile. Grab bar placement (typically at 90 centimetres and 120 centimetres from the floor) should be planned during the layout phase.
A walk-in shower with curbless entry is inherently more accessible than a traditional shower enclosure because there’s no step to navigate. For aging homeowners or those with mobility concerns, this accessibility benefit is significant.
DIY vs. Professional Installation for Small Bathroom Showers
Installing a shower in a small bathroom is complex work that involves plumbing, electrical (for the exhaust fan), structural framing, waterproofing, and tile work. Many homeowners consider DIY installation to save money, but the risks and labour requirements often make professional installation the better choice.
The plumbing rough-in requires knowledge of code requirements, proper slope calculation, and understanding of mixing valves and trap installation. Mistakes in rough-in are expensive to fix because they’re hidden behind walls and tile.
Waterproofing is the most critical step, and it’s where DIY installations often fail. Improper membrane application or sealed seams lead to water intrusion, mold, and structural damage that costs far more to repair than the original installation would have cost.
Tile work requires skill to achieve proper slope (for walk-in showers), consistent grout lines, and appropriate sealant application. Small bathrooms demand precision because there’s no room for error; visible mistakes are magnified in a confined space.
The labour required for a small bathroom shower installation is substantial, typically 40-60 hours depending on complexity. For most homeowners, the time and skill required makes professional installation the practical choice.
White Rock Handyman & Renovations has completed small bathroom shower installations across Surrey, South Surrey, White Rock, Langley, Delta, and Cloverdale. Our team handles every aspect of the installation, from permits and inspections to final tile work. We ensure your shower meets BC Building Code requirements, functions properly, and delivers the visual impact you want in your small bathroom.
A small bathroom shower installation is one of the most impactful renovations you can make to your home. The combination of thoughtful layout, proper waterproofing, and skilled tile work transforms a confined space into a functional, attractive shower that you’ll enjoy for years. White Rock Handyman & Renovations specializes in exactly this type of work, with expertise in walk-in shower installations, curbless entry design, waterproofing, and tile work that meets code and exceeds expectations. Get a free estimate from our team and discover how we can maximize your small bathroom space.
Frequently Asked Questions
What are the minimum shower dimensions required by BC building code for a small bathroom?
BC Building Code requires a minimum shower enclosure of 76 centimetres by 76 centimetres (30 inches by 30 inches) for a square shower, though rectangular layouts are common. Walk-in showers need at least 91 centimetres of clearance in front of the shower entry. These minimums ensure safe entry, exit, and movement within the shower space. Always verify current municipal requirements with your local building department in Surrey, Langley, or your service area, as some jurisdictions have additional requirements.
Do I need a building permit to install a shower in a small bathroom in BC?
Yes, most shower installations in British Columbia require a building permit, particularly if you're converting a half-bath or adding plumbing. Permits ensure your work meets BC Building Code standards for waterproofing, drainage, ventilation, and plumbing safety. The permit process includes inspections at rough-in, waterproofing, and final stages. Contact your municipal building department in Surrey, South Surrey, Langley, Delta, or White Rock to confirm permit requirements and timelines before starting your project.
What waterproofing standards must be met for shower installations in British Columbia?
BC Building Code requires continuous waterproofing membranes on all shower walls and floors to prevent water intrusion into structural elements. The membrane must extend at least 20 centimetres above the finished floor on walls and cover the entire shower pan. All penetrations (plumbing, fixtures) must be sealed with silicone sealant rated for wet areas. Grout lines must be sealed with water-resistant products. Proper slope of the shower pan (typically 1:48 or greater) directs water to the drain, preventing pooling and moisture damage.
Can I install a shower in a small bathroom myself, or should I hire a professional?
Small bathroom shower installation involves complex plumbing rough-in, waterproofing, building permits, and code compliance that require licensed expertise. Mistakes in drainage slope, waterproofing membrane application, or plumbing connections lead to costly water damage and code violations. Professional installation ensures your work passes municipal inspections, meets BC Building Code requirements, and includes WorkSafeBC clearance and Commercial General Liability insurance protection. White Rock Handyman & Renovations handles all permitting, inspections, and code-compliant installation for homeowners across Surrey, Langley, Delta, and the Lower Mainland.