
Table of Contents
- How to Replace a Bathroom Vanity: The Complete Process
- The Best Tools for Vanity Replacement
- Step 1: Shut Off Water and Disconnect Supply Lines
- Step 2: Disconnect the P-Trap and Drain Assembly
- Step 3: Remove the Old Vanity and Prep the Wall
- Step 4: Measure, Mark, and Set the New Vanity
- Step 5: Connect Plumbing and Install the Countertop
- Plumbing Requirements for Bathroom Vanity Installations
- Frequently Asked Questions
Last Updated: September 7, 2026
How to Replace a Bathroom Vanity: The Complete Process
Replacing a bathroom vanity is one of the highest-impact updates a homeowner can tackle, transforming the entire look of the space in a single weekend. Whether you are refreshing a guest bath or preparing for a full renovation, understanding how to replace bathroom vanity units correctly prevents water damage, plumbing leaks, and costly callbacks. White Rock Handyman & Renovations has over 37 years of industry experience, and we know where DIY efforts typically go wrong.
A bathroom vanity replacement involves removing the old cabinet, preparing the wall, setting the new unit, and reconnecting the plumbing. The most common failures we see are not from the installation itself but from skipped prep work and improper sealing. Below, we break down the complete process into manageable steps, covering the tools you need, the plumbing requirements, and the real-world obstacles most guides ignore. If you are replacing a vanity as part of a larger bathroom renovation, our team completes standard and small bathroom renovations in just one week (5-7 business days) thanks to our dedicated one-project-at-a-time model.
The Best Tools for Vanity Replacement
Before touching a single screw, gather the right equipment. The best tools for vanity replacement are not exotic; they are the specific implements that make each step cleaner and safer.
You will need an adjustable wrench and a basin wrench for the supply lines and mounting nuts, a pipe wrench for stubborn drain connections, and a stud finder to locate solid anchor points. A level is non-negotiable for ensuring the cabinet sits true, while a caulking gun and silicone caulk seal the top and edges against water intrusion. For the drain assembly, keep plumber’s putty, Teflon tape, and PVC cement on hand. A putty knife, utility knife, and pry bar handle the demolition, and shims correct an uneven floor.
Step 1: Shut Off Water and Disconnect Supply Lines
The first step is shutting off the water at the shut-off valves, typically located on the wall behind the vanity. Close both the hot and cold valves by turning them clockwise. If the valves are seized or absent, shut off the main water supply for the home before proceeding.
Once the water is off, open the faucet on the vanity to relieve any pressure in the lines. Use your adjustable wrench to disconnect the supply lines from the shut-off valves. Have a bucket and towels ready, as residual water will drain from the lines. If the supply lines are old, corroded, or look questionable, replace them while you have access; it is inexpensive insurance while learning how to replace bathroom vanity plumbing safely.
Step 2: Disconnect the P-Trap and Drain Assembly
Place a bucket directly under the P-trap, the curved pipe beneath the sink drain. Loosen the slip nuts on both ends of the P-trap using your pipe wrench or by hand if they are plastic. Remove the trap and set it aside, allowing any trapped water to drain into the bucket.
Next, disconnect the drain tailpiece from the sink basin. Depending on your setup, you may need to reach behind the cabinet with a basin wrench to loosen the mounting nut holding the drain flange. With the drain assembly free, you can now clear the area under the sink completely.
Step 3: Remove the Old Vanity and Prep the Wall
With the plumbing disconnected, remove the countertop and sink basin as a single unit if possible, or detach the basin first. Cut through any silicone caulk sealing the vanity to the wall and floor using a utility knife. This prevents tearing the drywall paper when you pull the cabinet forward.
Check for screws securing the vanity to the wall studs, usually located inside the cabinet. Remove them, then gently pry the cabinet away from the wall. An old vanity may be heavy, so have a helper ready.
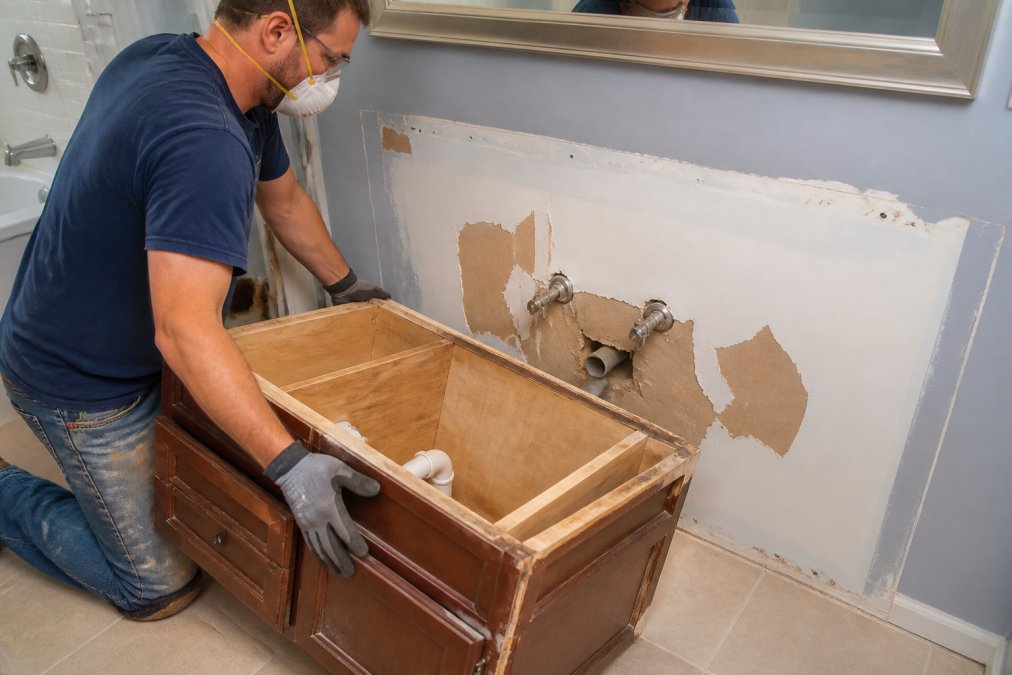
This is where the real work begins. The wall behind an old vanity is often damaged, stained, or missing drywall around the plumbing rough-in. Repair any holes or damage now, as the new vanity will not cover imperfections that sit outside its footprint. If you discover water damage or mold, address the source before installing anything new. For unusually complex wall conditions, a licensed general contractor can assess whether structural repairs are needed before proceeding.
Handling Non-Standard Wall Conditions
Most installation guides assume you are working against a flat, perfectly plumb wall. In practice, that is rarely the case in homes across the Lower Mainland. Here is how to handle the conditions we see most often after 37 years in the field:
- Uneven or out-of-plumb walls: Older homes often have walls that are not perfectly straight. Before setting the new cabinet, hold a long level vertically against the wall at the installation point. If you find a gap of more than 6 mm (1/4 inch) across the vanity’s width, you have two options. For minor deviations, shim the back of the cabinet at the stud locations to bring it plumb. For more significant bowing, scribe the back edge of the cabinet to match the wall contour using a compass or scribing tool, then cut along the line with a jigsaw. This creates a custom fit that prevents gaps and keeps the countertop seated properly.
- Tile or wainscoting behind the old vanity: If you are not replacing the floor or wall tile, you may find that the new vanity is shallower or deeper than the old one, leaving a gap at the back or causing the cabinet to overlap existing trim. Measure the depth of the new cabinet against the space. If the new unit is deeper, you may need to remove and reinstall a section of baseboard or tile. If it is shallower, you will need to extend the plumbing rough-in stubs to reach the new shut-off valves.
- Corner installations: If your new vanity is going into a corner, the cabinet must clear the baseboard on the adjacent wall. Measure from the corner to the outside edge of the baseboard and account for this in your width calculation. A common mistake is ordering a vanity that is too wide to fit between the corner and an adjacent tub or shower, leaving no room for the cabinet to slide into place.
Repairing Drywall Damage Properly
Repairing the wall behind the vanity is not about making it look perfect; it is about creating a flat, stable surface that will not telegraph imperfections through the new cabinet. For holes smaller than 10 cm (4 inches), use a drywall patch and setting compound. For larger damaged areas, cut back the drywall to the nearest studs and install a new piece of drywall, taping and mudding the seams. Do not use lightweight spackle for structural repairs; it shrinks and cracks. Sand the repaired area smooth and prime it before installation to prevent the new drywall from wicking moisture from the air.
If you discover evidence of a past leak, such as stained or soft drywall, investigate the source before covering it up. In many cases, the leak originated from a failing supply line or drain fitting that was hidden behind the old cabinet. Replacing the drywall without addressing the source of the moisture will only delay the problem. A renovation is the right time to correct these issues, and our team at White Rock Handyman & Renovations routinely coordinates plumbing and drywall repairs as part of a full bathroom renovation, which we complete in just one week (5-7 business days) thanks to our one-project-at-a-time model.
Step 4: Measure, Mark, and Set the New Vanity
Before installing, confirm the new vanity’s dimensions against the available space. Measure the width at the wall and account for baseboards and trim. Locate the wall studs with your stud finder and mark their positions; you will need them for secure mounting.
Place the new vanity cabinet in position and check it with a level in both directions. Floors are rarely perfectly level, so use shims under the cabinet base to bring it true. This step matters more than any other: a cabinet that is not level will cause the countertop to sit improperly and the sink to drain poorly.
Once level, secure the cabinet to the wall studs using the mounting hardware provided, driving screws through the back panel. Trim the shims flush with a utility knife after the cabinet is anchored. If the vanity does not sit flush against the wall, do not force it; check for obstructions like outlet boxes or plumbing that may need adjusting.
Step 5: Connect Plumbing and Install the Countertop
With the cabinet secured, install the faucet and drain assembly onto the sink basin before setting the countertop. Apply a bead of plumber’s putty around the drain flange and silicone caulk around the faucet base to create watertight seals.
Set the countertop onto the cabinet, ensuring it is level and properly seated. Secure it according to the manufacturer’s instructions, then reconnect the supply lines to the faucet, using Teflon tape on the threaded connections. Reinstall the P-trap, aligning it with the drain pipe in the wall.
Plumbing Requirements for Bathroom Vanity Installations
Understanding the plumbing requirements for bathroom vanity installations is essential for a code-compliant and leak-free result. Your local building code governs the drain pipe size, venting, and trap configuration. Most residential bathroom sinks use a 1.25-inch or 1.5-inch drain line, and the P-trap must be properly vented to prevent siphoning.
The shut-off valves should be easily accessible and in good working order. If your existing valves are old or the rough-in height does not match your new vanity, you may need to adjust the plumbing stubs coming from the wall. This is a job for a licensed plumber or a general contractor with plumbing expertise, as improper connections can lead to leaks inside the wall.
For homeowners in British Columbia, any work involving changes to the plumbing rough-in or drainage may require a permit and inspection. WorkSafeBC clearance and municipal business licensing ensure the contractor carrying out the work is qualified and accountable.
|
Common Installation Error |
How to Prevent It |
Why It Matters |
|---|---|---|
|
Cabinet not level |
Use shims and check with a level in both directions |
Causes poor sink drainage and countertop gaps |
|
Reusing old supply lines |
Replace with new braided lines |
Old washers fail, causing hidden water damage |
|
Skipping silicone caulk at the top edge |
Seal between countertop and wall |
Prevents water from running behind the vanity |
|
P-trap misaligned with wall drain |
Adjust drain pipe height or use an extension |
Leaks at the slip joints and foul odors |
|
Over-tightening compression fittings |
Tighten by hand, then a quarter turn with a wrench |
Cracks the fitting and causes leaks |
Disposal of the old vanity is another consideration most guides skip. Many municipalities in the Lower Mainland do not accept construction debris in regular curbside pickup. Check your local transfer station for drop-off rules, or factor removal into your renovation plan.
If this project is part of a larger bathroom update, consider the overall scope. A new vanity often highlights dated tile, worn flooring, or an inefficient layout. White Rock Handyman & Renovations specializes in custom bathroom renovations, tub-to-shower conversions, and complete remodels, all completed to code requirements with full WorkSafeBC clearance and $5 million Commercial General Liability insurance. Our detailed quotes and free estimates with zero call-out fees mean no surprises, and our one-project-at-a-time model ensures your renovation receives our complete focus from start to finish.
Replacing a bathroom vanity is a satisfying project that delivers immediate visual impact, but the details determine whether it lasts. Proper prep, correct sealing, and code-compliant plumbing are what separate a professional result from one that fails within a year. If you are planning a full bathroom renovation or need expert help with a complex installation, the team at White Rock Handyman & Renovations brings 37 years of experience to every project. Get started with a free estimate and see how straightforward a code-compliant renovation can be.
Frequently Asked Questions
Can I replace my bathroom vanity myself?
Yes, if you have solid DIY skills and the right tools, you can replace a bathroom vanity yourself. The process involves shutting off the water supply, disconnecting the P-trap and supply lines, removing the old cabinet, and installing the new one with proper leveling and sealing. However, if the plumbing rough-in doesn’t align with your new vanity, or if you encounter water damage or non-standard wall conditions, a professional contractor can handle these issues efficiently. A licensed contractor also ensures plumbing code compliance and manages any needed permits.
How long does a professional bathroom vanity installation typically take?
A professional vanity installation is usually completed within a day or two when handled as a standalone swap. However, when you replace a bathroom vanity as part of a full renovation, the bathroom renovation timeline for a standard project is typically just one week, or 5-7 business days. This is achievable with a dedicated one-project-at-a-time model, where the crew works exclusively on your bathroom until completion. For larger, complex renovations, the timeline varies based on scope, materials, and inspections.
What are the plumbing requirements for a new bathroom vanity?
The plumbing requirements for a bathroom vanity involve connecting the drain assembly, P-trap, and water supply lines. You must ensure the drain pipe rough-in aligns with the new sink’s drain outlet, and that shut-off valves are accessible and functional. Use Teflon tape on threaded connections and compression fittings for a watertight seal. A proper leak test after installation is essential. If your new vanity has a different configuration than the old one, you may need to extend or relocate supply lines and the drain pipe, which requires careful attention to code.
Can you replace a vanity without replacing the sink?
Yes, you can replace a vanity cabinet and keep the existing sink and countertop, provided the dimensions match and the countertop is in good condition. This is often done to update the storage or style of the bathroom without the cost of a new top. However, the existing countertop must be carefully detached without cracking, and the new cabinet must support its weight and align with the sink drain and supply lines. For a seamless look and to avoid leaks, many homeowners choose to replace both together.
White Rock Handyman & Renovations specializes in complete bathroom renovations, custom vanities, tub-to-shower conversions, walk-in showers, custom tile, and professional Schluter waterproofing systems throughout Surrey, South Surrey, White Rock, Langley, Delta, Cloverdale, and Tsawwassen. With more than 37 years of local renovation experience, we work on one project at a time so your bathroom receives our full attention from start to finish. Standard and small bathroom renovations are typically completed in just 5–7 business days. We carry full WorkSafeBC clearance, $5 million Commercial General Liability insurance, and municipal business licensing, with free estimates and zero call-out fees.