
Table of Contents
- Why an Aging in Place Bathroom Renovation Starts With a Safety Audit
- Step 1: Build Your Bathroom Renovation Planning Checklist
- Step 2: Plan an Accessible Bathroom Renovation Around Real Mobility Needs
- Step 3: Choose a Walk-In Shower for Seniors Over a Tub
- Step 4: Get Bathroom Grab Bar Placement Right the First Time
- Step 5: Reduce Fall Risk With Non-Slip Flooring and Better Layout
- What to Ignore, What to Prioritize, and Who Should Do the Work
- Conclusion: Plan the Bathroom You Will Still Be Safe In at 85
- Frequently Asked Questions
Last Updated: October 12, 2026
Why an Aging in Place Bathroom Renovation Starts With a Safety Audit
An aging in place bathroom renovation begins with a safety audit, not a tile sample. Walk the room and flag every spot where a slip, reach, or step could become a fall.
At White Rock Handyman & Renovations, we have spent 37+ years renovating bathrooms across Surrey, South Surrey, White Rock, Langley, Delta, Cloverdale, and Tsawwassen.
Walk Through the Bathroom as Your Future Self
Stand at the door. Ask three questions:
- Can I get in without lifting my feet over a lip?
- Can I sit down safely if I feel dizzy?
- Can I reach everything without twisting or stretching?
If any answer is no, that spot goes on the list. Do this walk-through with the person who uses the bathroom most. Their answers matter more than yours.
Measure Before You Choose Anything
Measurements drive every decision that follows. Record doorway width, toilet-to-wall distances, shower or tub opening size, and floor space in front of the vanity. Bring these numbers to any contractor conversation; guessing leads to expensive changes later.
Step 1: Build Your Bathroom Renovation Planning Checklist
A bathroom renovation planning checklist keeps a complex job from drifting. Build it before you call anyone, and update it as you learn more.
Start with these items:
- Safety audit complete, with photos
- Measurements recorded
- Mobility needs written down for each user
That last point matters. Deposit structures vary by contractor, project, and scope. Our own projects require a 50% deposit of the total invoice to book and secure the work. Get your structure in writing before anyone starts.
Step 2: Plan an Accessible Bathroom Renovation Around Real Mobility Needs
An accessible bathroom renovation should fit one specific person, not a generic average. Two households with the same diagnosis often need different layouts, so match each mobility aid to a measurable clearance and confirm those numbers with a qualified renovator before demolition.
Start With Clearances, Not Features
These dimensions cover most residential aging in place situations. Treat them as planning targets, not code requirements, and confirm final numbers with your contractor and municipality:
- Doorway width: A clear opening of at least 81 cm (32 inches) is recommended. A 86 cm (34 inch) door is a common compromise that still fits most walkers.
- Turning space: A 152 cm (60 inch) diameter circle inside the room, or a T-shaped space at least 91 cm (36 inches) wide in each arm, lets a wheelchair or walker turn without a three-point shuffle.
- Knee space at the vanity: At least 69 cm (27 inches) high, 76 cm (30 inches) wide, and 48 cm (19 inches) deep for a seated user.
Write these numbers into your renovation brief. A contractor who asks about mobility aids before quoting is doing the job properly.
Plan for the Aid, Not the Diagnosis
The same condition can require completely different layouts depending on what the person uses day to day:
- Walker: Needs an 86 cm (34 inch) door, a clear path from door to toilet, and a place to park the walker outside the shower. A folding shower seat is usually enough.
- Wheelchair: Needs a 152 cm (60 inch) turning circle, a roll-in or curbless shower, a wall-mounted or open vanity, and offset plumbing so the drain does not sit under the chair.
- Balance limitations only: Needs grab bars at the toilet and shower entry, a non-slip floor, and a handheld showerhead on a slide bar. A full remodel may not be necessary.
Plan for Change, Not Just Today
A common pattern is to renovate for today’s ability and regret it in five years. Build in the future now while walls are open: install blocking for grab bars at the toilet, shower, and tub even if bars go in later; choose a shower large enough to add a seat or second grab bar without a rebuild; keep the floor drain and slope compatible with a future curbless conversion; and leave the vanity open underneath for a future wheelchair.
Bring the List to a Renovation Specialist
A mobility plan only works if the structure supports it. Blocking, slope, drain placement, and waterproofing must be designed together. White Rock Handyman & Renovations has spent 37+ years renovating bathrooms across Surrey, South Surrey, White Rock, Langley, Delta, Cloverdale, and Tsawwassen, and we build these clearances into the framing stage rather than retrofitting them afterward. As a licensed general contractor bathroom remodel Langley homeowners trust, we hold full WorkSafeBC clearance, $5 million CGL insurance, and municipal business licensing across those communities, with free estimates and no call-out fees.
Step 3: Choose a Walk-In Shower for Seniors Over a Tub
A walk-in shower for seniors beats a tub in almost every case. Climbing over a tub wall is one of the riskiest moves in the home, and a low-threshold shower removes it.
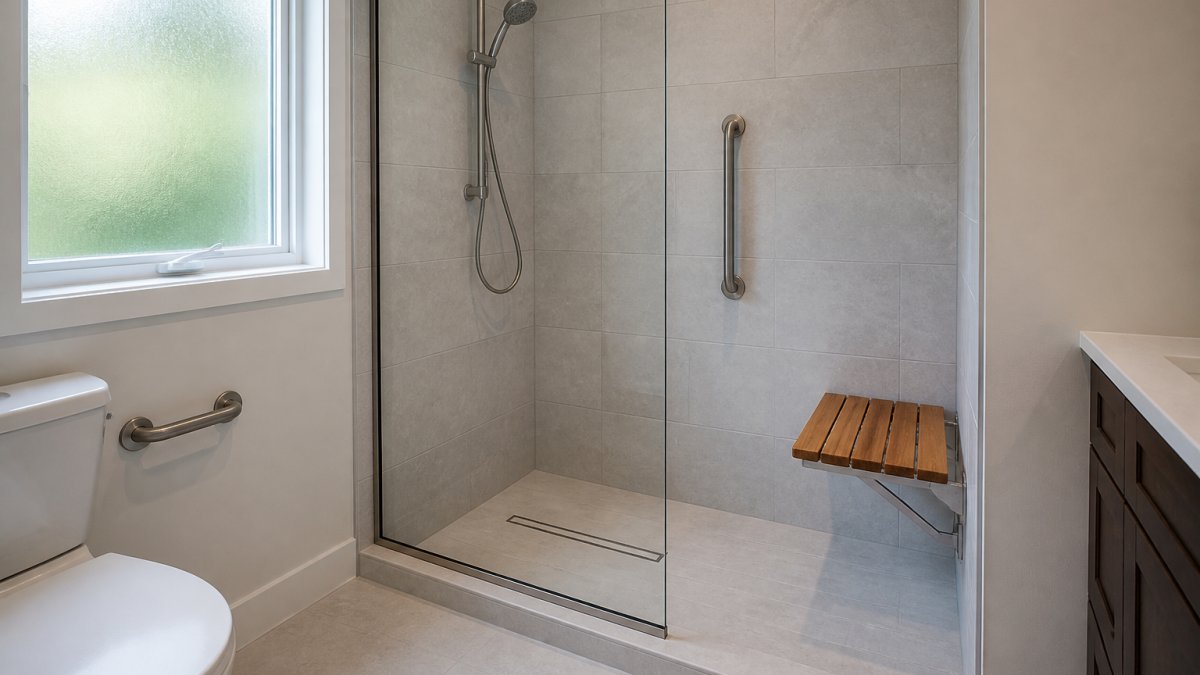
Curbless Showers, Benches, and Support Getting In and Out
A curbless shower lets someone walk or roll straight in with no barrier at all. It costs more because the floor must slope to a linear drain, but it is the safest option available. Add a fold-down bench, a handheld showerhead on a slide bar, wall blocking for future grab bars, a vertical grab bar at the entry, and a linear drain to reduce standing water.
Step 4: Get Bathroom Grab Bar Placement Right the First Time
Bathroom grab bar placement follows the path a person actually moves, not a decorative pattern. Mount bars beside the toilet at sitting and standing height, vertically at the shower entry, inside the shower, and along any step or level change. Backing must go into the wall framing before tile goes up; retrofitting later means cutting into finished walls.
Step 5: Reduce Fall Risk With Non-Slip Flooring and Better Layout
Non-slip flooring is the single biggest fall-prevention upgrade in any bathroom. Slip resistance comes from surface texture, not colour or price, so choose based on how wet the floor gets, how easy it is to clean, and how it fits the renovation.
Compare Flooring Options by Real Trade-Offs
|
Option |
Slip Resistance |
Maintenance |
Installation Notes |
Best For |
|---|---|---|---|---|
|
Textured porcelain tile |
High |
Easy |
Requires a proper substrate and grout lines for grip |
Most bathrooms |
|
Matte ceramic tile |
Medium |
Easy |
Less texture than porcelain, more affordable |
Dry zones and powder rooms |
|
Vinyl sheet |
Medium-high |
Very easy |
Seams can lift in wet areas if not installed well |
Tight budgets and quick timelines |
|
Polished stone |
Low |
Higher |
Needs sealing and is slippery when wet |
Walls and accents, not floors |
|
Cork or rubber |
Medium-high |
Moderate |
Softer underfoot, less common in wet rooms |
Small, low-traffic bathrooms |
Add a rubber-backed bath mat outside the shower, keep the floor clear of clutter, and route towels off the ground. Wet rooms also need ventilation; a properly sized exhaust fan clears moisture and cuts mould growth on grout and caulk.
Prioritize Upgrades by Impact, Not by Cost Alone
Not every safety improvement requires a full renovation. Sequence the work by impact per dollar: grab bars with proper backing, a non-slip mat, a handheld showerhead, and a comfort-height toilet are highest impact with the least disruption; non-slip flooring, lever faucet handles, better lighting, and a shower seat are medium; a curbless or low-threshold shower, widened doorway, and full layout change are highest impact but most disruptive.
Comfort-Height Toilets, Accessible Vanities, and Reachable Storage
A comfort-height toilet sits taller than a standard one, making sitting down and standing up easier on knees and hips. Pair it with a toilet paper holder within easy reach. For the vanity, look for open space underneath for a wheelchair or walker, lever-style faucet handles, a counter the user can reach while seated, and storage between waist and shoulder height.
Layout Changes That Reduce Risk
Sometimes the safest upgrade is moving a fixture. Move the toilet away from a corner to make room for a walker or caregiver, swap a swinging door for a pocket or outward-swinging door so it does not block the floor, shift the shower entry away from the main walking path, and add a niche inside the shower so bottles are not stored on the floor or a high shelf.
What to Ignore, What to Prioritize, and Who Should Do the Work
Prioritize structure over style. Waterproofing, wall backing, drainage, and non-slip surfaces do the safety work. Tile colour does not.
Skip anything that adds a step or a reach:
- Deep soaking tubs
- Pedestal sinks with no storage
- Glass shelves mounted high
Permits and code compliance belong in the plan from day one. Bathroom work often involves plumbing and electrical changes, and municipalities across the Lower Mainland each run their own permit process.
This is also not a job for a general handyperson. Waterproofing done wrong shows up as rot and mould years later.
Conclusion: Plan the Bathroom You Will Still Be Safe In at 85
Safety features added early cost far less than an emergency retrofit after a fall.
White Rock Handyman & Renovations builds these bathrooms every week. We hold full WorkSafeBC clearance, $5 million CGL insurance, and municipal business licensing across Surrey, White Rock, Langley, Delta, Cloverdale, and Tsawassen.
Get a free estimate with no call-out fees and a detailed quote before anything begins.
Frequently Asked Questions
Are walk-in showers safer for seniors than bathtubs?
For most seniors, yes. Stepping over a tub wall is one of the highest-risk movements in a bathroom because it combines a raised threshold, a wet surface, and a narrow landing area. A walk-in shower for seniors removes that step or reduces it to a low curb, and it allows a shower bench, handheld showerhead, and grab bars to be positioned exactly where support is needed. Many homeowners combine the change with a Schluter KERDI waterproofing system so the shower pan, curb, and bench are sealed correctly behind the tile.
How do I plan an aging in place bathroom renovation in British Columbia?
Start with a bathroom renovation planning checklist: measure the room, note door widths and turning space, and list the mobility aids anyone in the home uses now or may use later. Decide the layout before choosing tile or fixtures. In British Columbia, plumbing and electrical changes usually require permits, and the work must meet the BC Building Code and municipal requirements. Confirm your contractor carries a current WorkSafeBC clearance letter, $5 million CGL insurance, and a municipal business licence before work starts.
Where should grab bars be installed in a senior-friendly bathroom?
Bathroom grab bar placement matters more than the number of bars. Install them at the shower entry, inside the shower at seated and standing height, beside the toilet, and along any path where someone might need to steady themselves. Bars must be anchored into wall framing or blocking, not just drywall, so decide placement before the walls are closed. A horizontal bar beside the toilet and a vertical bar at the shower entry cover the two highest-risk transfers.
How do I keep an accessible bathroom renovation within a realistic budget?
Prioritize in order of fall risk: non-slip flooring, grab bar blocking, a shower bench, and a handheld showerhead deliver the biggest safety gain for the least disruption. Layout changes that move plumbing cost far more than fixture swaps, so keep the toilet and drain in place unless the current layout genuinely does not work. Request a detailed written quote before work begins so you can compare scope, not just totals. White Rock Handyman & Renovations provides free estimates with no call-out fees.